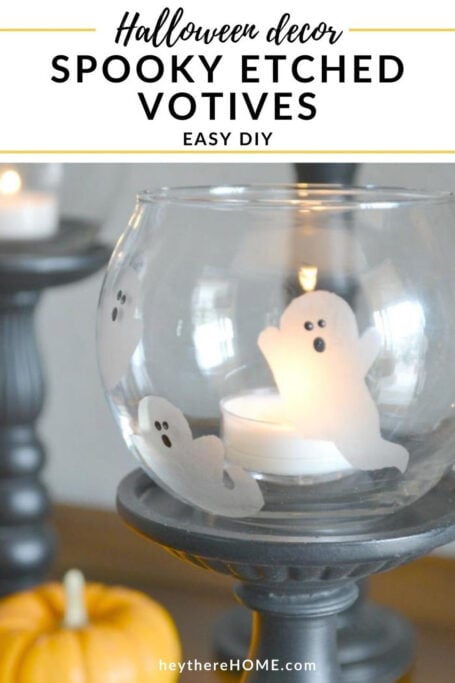
DIY Spooky Ghosts Etched Votives
No need for your Halloween decorations to be scary when you could make these easy DIY spooky ghost etched votives!
Boo! Did I scare you? Better get used to it because Halloween is just around the bend!
I know, I can’t believe it either. This time of year goes by so super fast. Just about as fast as you will be able to make these DIY Spooky Ghosts Etched Votives to add to your Halloween decorations this year!
And that isn’t all! Remember that talented group I used to post with? I call them my bloggy friends and they each have a fun little project to share with you too. You’ll see the links at the bottom of this post. Consider yourself perfectly squared away when it comes to ideas for things to make this Halloween.
Aren’t these etched votives so cute?

We don’t do scary Halloween around here. I’ve never been into the evil or gory stuff when it comes to Halloween decorations or costumes. I have little ones, so keeping it fun and not too spooky is a must.
Let’s get started. Here is what you will need to make these DIY Spooky Ghosts Etched Votives.
Supplies For DIY Etched Votives
This post contains affiliate links for your convenience. Read the full disclosure.
- Votives: I got mine at Michael’s for a buck each.
- Self-adhesive covering (Con-tact brand or equal)
- X-acto knife
- Cutting mat or cutting board
- Plastic utensil
- Gloves
- Glass etching cream

Make The Ghost Shapes
Step 1: Draw and cut the shapes
The first thing you need to do is draw out or trace some ghost shapes. I found some on a Google image search and traced them right from the iPad. The size will depend on the size of your votives and how big or how many ghosts you want on each one.
Once you have your ghosts, you will trace them onto the back side of the Con-tac paper and cut them out with your X-acto knife (I did 3 ghosts per votive).
Step 2: Place ghosts on the votives
Then you are going to use the outline portion of your cutout and place them on the votives. Make sure that the edges of the ghost are pressed down really well. If your votives are rounded like mine, you will need to find a spot on the outline of the ghost to fold it over so that there are no bubbles along the outline. You can see my folds in the picture above.
I was able to do 2 ghosts and then when I was done with the following steps, I went back and added one more ghost to each votive.

Glass Etching Cream
Step 3: Apply the etching cream
Use gloves for this part!!! Etching cream will burn the heck out of your skin!!!
Spread the etching cream onto the middle portion of each ghost with a plastic utensil. Don't get too much on there or it will drip. And if it drips past the stencil you will end up with blobs of etched area, which you don't want.
Let the etching cream sit for 15-20 minutes. Give it a little swirl with your plastic utensil every five minutes to get rid of any air bubbles and to get a nice even etch. I used towels to hold them on their sides while they sat so that the cream didn’t drip down.
Step 4: Rub off the cream and draw the face
After 15-20 minutes run the votives under warm water and rub the cream off with gloves on. The Con-tac paper will come off really easily too and your ghosts will appear! (They will show up more when the glass is dry.)
To finish them I added little eyes and a mouth with some black craft paint and the tip of a mechanical pencil, and done!

I placed each one on a candle holder to give them some height and just think they are too cute and perfect on my entry table!
So, are you ready for more? Here are 7 more fantastic Halloween DIY ideas!

- 1) Halloween Paper Wreath by Cook and Craft Me Crazy
- 2) Knock If You Dare by From Wine to Whine
- 3) Spooky Ghosts Etched Votives by Hey There Home (you are here)
- 4) Rice Krispy Treat Tombstones by Play. Party. Pin.
- 5) Countdown to Halloween Sign by Lil Mrs Tori
- 6) Bat Wreath by Whistle and Ivy
- 7) Black and White Pumpkin Painting by Homemade Ginger
- 8) Eraser-Stamped Halloween Shirt by Cutesy Crafts

P.S. What if I told you there's a whole new (and way easier) way to decorate your home—without the overwhelm, indecision, or endless Pinterest scrolling.

Inside my online decorating program, Style Your Way Home, I'll walk you through the process of discovering and defining your decorating style, creating a home decor plan, and show you how to apply it in any space so each room is unique while maintaining a cohesive look that feels like YOU! - When you join now, you'll get direct support from me... it's like having a design BFF in your back pocket!


