DIY Blanket Ladder For Less Than $10
Looking for an easy blanket ladder DIY? This DIY blanket ladder tutorial will show you how to make a blanket ladder (or quilt ladder) using simple materials so you can add a decorative wood ladder to your decor without spending a fortune.
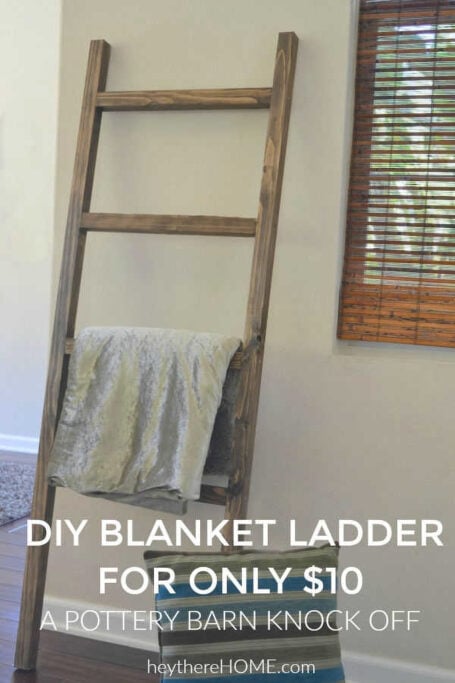
When I first set out to make this ladder for blankets, I had a wooden Pottery Barn blanket ladder in mind for inspiration. That one goes for $249 which is insane because I made my wood blanket ladder for less than $10.
I'll pause while you rub your eyes and reread… two. hundred. and. forty. nine. dollars. For some wood that leans against the wall! Whaaaat? Ludicrous!
I'll show you how to build a blanket ladder in less than 30 minutes plus some drying time. A DIY blanket ladder is so simple and you can use your ladder as decor to display quilts, towels or use it as a throw blanket ladder to add to your decor in a functional way.
In This Article:
Don’t want to build a blanket ladder or looking for a different style? I’ve rounded up decorative ladders for blankets that you can buy in different styles for you here.
Does Decorating Feel Confusing? - It's because you're starting in the wrong place.

The secret isn’t more inspiration - it’s a clear plan.
Grab my free Function First Decorating Guide and learn the simple first step that makes every decorating decision easier.
Supplies For A Blanket Ladder DIY
Here's what you'll need to make a 5ft. tall and 18 inch wide throw blanket ladder.
Of course if you're looking to make a blanket ladder 6ft. tall, or a wide blanket ladder, you'll just change your blanket ladder dimensions accordingly.
This post contains affiliate links for your convenience. Read the full disclosure.
- Blanket Ladder Wood: 16 feet of wood. I used (1 ⅜ x 1 ⅜) 8 foot furring strips that were $2.15 each
- Eight 2 - ½ inch wood screws
- Wood glue
- Stain (I used Minwax in Dark Walnut)
- Drill
- Saw - if you don't own a chop saw you could easily do this project by hand with a hacksaw
- (Optional) Felt pads to put at the top of the ladder where it leans against the wall so it doesn't mark up your wall.
- (Optional) Clear coat so that you don't have to worry about the stain getting on your blankets.
Click Play to See How to Make a Blanket Ladder Video
How to Make a Blanket Ladder
Step 1: Cut the wood for your wooden blanket ladder
*These cuts may change depending on your specific blanket ladder plans.
- Cut one 5 foot piece of wood from each of your 8 foot pieces, so you have two five foot pieces for the sides of the ladder.
- Cut four 18 inch pieces of wood from the remaining wood for the rungs of the ladder. (These need to be pretty exact.)

Step 2: Arrange the pieces of your wood blanket ladder
- Lay each piece of your DIY blanket ladder out on the ground to make a ladder.
- You'll arrange the spacing of the rungs depending on how you plan to decorate your DIY blanket ladder rack. I put mine 12 inches apart, but started 18 inches from the ground and left just 6 inches at the top so that I could hang a blanket nicely on the bottom bar.

You May Also Like


Step 3: Glue the pieces of your ladder for blankets together
- Dab a little bit of wood glue on the end of each rung then attach it with a screw from the outside of each side piece going straight into the center of the end of each rung.
Step 4: Stain the blanket ladder wood (optional)
- Stain the throw blanket holder the color of your choice and let it dry and air out completely (so it doesn't stink up your house or your blankets).
- If you decide to stain your blanket ladder, finish with a clear coat if you think your stain may get onto your blankets.
I've made two of these diy blanket ladders. One was stained to have a more rustic decor style for a friend, and one was left natural for my more modern home decor style.
Step 5: Style your decorative wooden ladder
There are so many blanket ladder decorating ideas that go way beyond displaying blankets and quilts. You can use your ladder to display seasonal decor like stockings, or use it to add storage and organization.


Different Uses For A Decorative Ladder
There are so many ways to use a blanket ladder to add style to your home.
Sure, the obvious thing to do is to use it to display blankets or quilts but even these can be changed out seasonally. In the cooler months you can use your blanket ladder to display soft and cozy blankets to add texture to your space. And it the warmer months you can switch them out for lighter more colorful blankets to add to your summer or spring decor.
And of course when it comes to decorating for the holidays, you can use your blanket ladder to hang wreaths, stockings, or other seasonal items you want to display.
The ideas for decorating a blanket ladder are endless.

What do you think? I think I'm on a roll with getting the look without having to pay a fortune. I did it with this knock off DIY blanket ladder and I did it with my DIY Grommet Top Curtains!
Where To Buy A Blanket Ladder On A Budget
There are many blanket ladders to choose from that can fit any home decor style. I've scoured the internet and found decorative ladders for blankets and broke them down into categories of different styles, colors, and materials - all for less than $100.
Have you made your own blanket ladder using these instructions?
We'd love to see your finished blanket ladder! Send us your photos here.

P.S. What if I told you there's a whole new (and way easier) way to decorate your home—without the overwhelm, indecision, or endless Pinterest scrolling.

Inside my online decorating program, Style Your Way Home, I'll walk you through the process of discovering and defining your decorating style, creating a home decor plan, and show you how to apply it in any space so each room is unique while maintaining a cohesive look that feels like YOU! - When you join now, you'll get direct support from me... it's like having a design BFF in your back pocket!
Frequently Asked Questions - How To Make A Blanket Ladder
Can I use this DIY blanket ladder for quilts?
It depends on how wide, heavy and bulky your quilts are but you can definitely use this as a quilt ladder too.
The floor underneath is slick. How do I keep the ladder from slipping?
Attach soft adhesive non-slip rubber pads to the bottom to keep your blanket ladder from slipping.
How do I prevent scuff marks on the wall that the wooden ladder leans against?
A few felt adhesive pads (like you would attach to the bottom of chair legs) on the backside where it hits the wall will do the trick!
