• Skip to primary navigation
  • Skip to main content
  • Skip to primary sidebar
  • Skip to footer
  • New Here?
    • Meet Corey
    • Contact
  • Decorate Your Home
    • Popular Posts
    • Color In Your Home
    • How to Decorate
    • Declutter & Organize
    • DIY Projects
    • Seasonal Decor
  • My Courses
    • Style Your Way Home
    • The Declutter Method
    • Color Made Clear
    • Student Login
  • Tour My Home
  • Shop My Home
  • Hey There, Home
  • Nav Social Menu

    • Facebook
    • Instagram
    • Pinterest
    • YouTube
Hey There, Home

Hey There, Home

Learn to Decorate. Love Your Home.

West Elm Inspired Tripod Floor Lamp {Knock Off Decor Series}

Pin12.7K
Share1.1K
Email
13.7K Shares

 Hi friends! I hope you are smack dab in the middle of a fantastic weekend! I’m really excited to share my West Elm knock off lamp with you today!

We have been busy DIYers around here, which has paid off because today is the first day of my Knock Off Decor Series and I am so excited about it! One, because it is my first ever series, but also because all of those awkward moments taking photos of the lovely things I see in stores, only to get the stink eye from the people working there will finally pay off! Do you ever do that? I almost always enter a home decor store ready to  shop for take pictures of what I can recreate. This post contains affiliate links for your convenience. Click here for my full disclosure.

West Elm is one of my favorite stores and when I was browsing around in there a few months ago, I fell in love with their wood tripod floor lamp. Then I immediately fell out of love with it because it was $250 bucks. Then I fell in love with the idea of recreating my own very similar one. And so my DIY West Elm knockoff  version was born and I’m going to show you how we made it for just under 40 bucks!
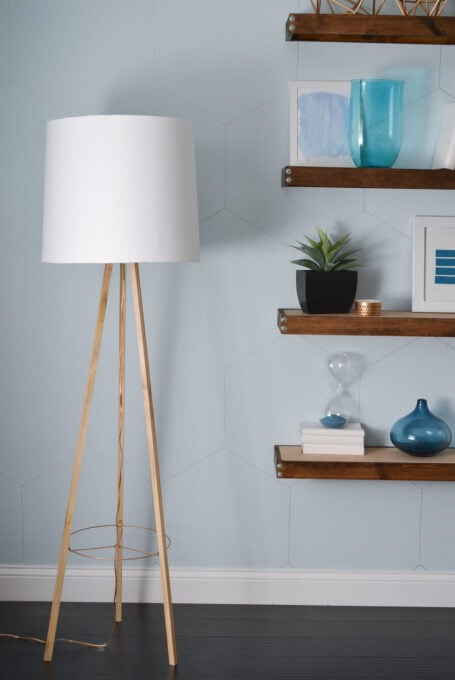
 Isn’t it pretty?

knock off west elm tripod floor lamp

I think I came pretty close to the one that inspired it all don’t you?

West Elm Knock Off Wood Tripod Floor Lamp

So are you ready to make your own? If you can make a few cuts with a saw and do a little bit of drilling, you can do this project. I’ll walk you through it and give you some little tips along the way so you can avoid some of my mistakes.

Supply list:

How to make a West Elm inspired tripod floor lamp
  • Three 3/4 inch square, 6 ft. long pieces of wood for the legs of the lamp. Get wood that looks nice and smooth especially if you are going to leave it natural like I did.
  • 1/4 inch metal cable clips to attach the metal ring at the bottom. (I found these at the hardware store next to the cable wire.)
  • a lamp kit (Amazon affiliate link)
  • 6 inch brass nipples (found right next to the lamp kit)
  • a pack of nuts and washers for lamp parts (also right next to the lamp kit)
  • a 4 inch piece of scrap wood that is about 1 1/2- 2 inches thick to hold the top of the legs together and to hold your light. I used MDF board from the trash can in the back of the home depot.)
  • a can of spray paint to paint your metal pieces and the cord. I used Krylon Gold Metallic spray paint (Amazon affiliate link)
  • 3 screws to attach the legs
  • a lamp shade and bulb
  • the top metal ring of a 16ish inch lamp shade. It needs to be one with 3 prongs like the one in the photo above. (I found mine at the Salvation Army for 3 dollars and ripped out the top ring.)

How to build a Wood Tripod Floor Lamp:

Step 1: Spray paint the top ring of the lamp shade that you ripped apart, 3 cable clips and screws that go with them, and your cord in the color of your choice.

Step 2: Cut each of your wood legs to 55 inches at a 5° angle at the top and bottom making sure that the surfaces of the ends are parallel.
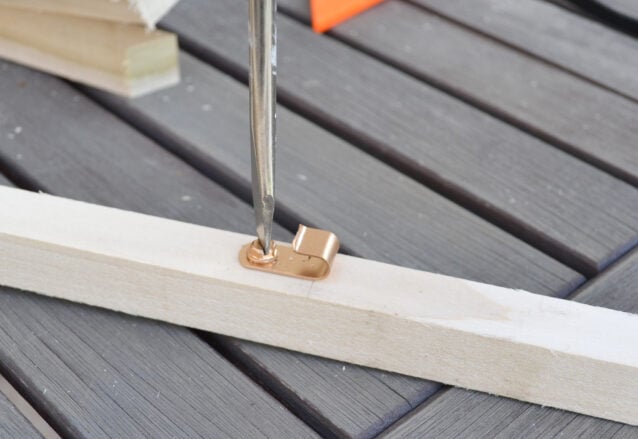
DIY Tripod Floor Lamp West Elm Knockoff

Step 3: Decide the placement of your bottom ring and attach the cable clips.

Have a buddy, hold up your cut legs in the position that they will be on your finished lamp while you hold the ring in place toward the bottom and mark where the cable clips will go.

You want to make sure that your lamp will be steady so be sure that the legs are not too close together. My ring was 15 inches and the ring ended up being 15 inches from the bottom of the legs. If your ring is a little bit smaller, you will need to move it up to keep the tripod wide enough.

Once you have marked where your ring will go, attach the cable clips to the inside side of each leg.

DIY Tripod Floor Lamp West Elm Knockoff

This part gave us a bit of trouble but here is what finally worked.

Step 4: Create a triangle to hold everything together.

Cut a triangle out of your scrap piece of wood that is 3 1/2 inches on each side. Then, mark 3/4 of an inch in from each point on all sides and cut each point off at a 10 ° angle.

Pre drill a hole for the nipple of the light kit in the center of your triangle too. (We didn’t do this and realized that it would be easier to drill this hole before attaching the legs…whoops!)

Step 5:  Attach the legs.

It is really important to pre drill your holes and go slow because you are working with small pieces of wood and you don’t want them to split.

So, pre drill holes (at a little bit of an angle) in each side of your cut triangle and each outside edge at the top end of your legs. Then, attach each leg with a screw, going slowly so you don’t split the wood.

pinching brackets

Step 6: Attach your bottom ring.

Place your bottom ring into the cable clips and press the clips in with your finger to hold them in place.

pinching brackets

Step 7:  Assemble the light kit.

Follow the instructions on the package of the light kit to attach it to your tripod lamp. I had the bottom of the 6 inch nipple pretty far down to add detail in the finished product. It will depend on your lamp shade, but you want the lamp shade to just cover the wood triangle part at the top.

Step 8: (optional) Stain your legs.

I rubbed a coat of teak oil on my legs just to bring out the natural color of the wood a little bit. I really liked the natural color though so I didn’t stain them. Plus I like the contrast of the wood tones when it is next to the Rustic Floating Shelves that we built.

Step 9: Add a shade and you are done!

I recovered a large lamp shade that I found at a thrift store for $5. It had a textured fabric on it originally, but I was still able to make it work and I’ll be showing you how I did it later this week.

So here she is in all her beauty! I love the simple details that the metal brings and may I just say this tripod lamp looks perfect against the subtle pattern of the DIY Sharpie Wallpaper!

So what do you think? Did I get it pretty close to the inspiration?

Pin12.7K
Share1.1K
Email
13.7K Shares

Filed Under: Decorate Your Home, DIY Projects

email signature no image

Primary Sidebar

I break decorating down into simple and repeatable steps that anyone can follow, --even if you don't have an eye for design, so you can create a beautiful home that feels like YOU. >> Learn more.

Let’s connect!

  • Facebook
  • Instagram
  • Pinterest
  • YouTube
best decorating tips from Hey There Home

Categories

Take a free decorating class

Footer

More Freebies:

Free Video Class: Choose & Use Color In Your Home Like A Pro

Free Video Class: 3 Steps To Decorate Any Area In Your Home

Important Links:

My You Tube Channel

Contact

© Hey There Publishing, LLC

All images, text, and free downloads are the property of Hey There Publishing, LLC and can not be used in any way without written consent.

Disclosure & Cookie Policy

Let’s Connect!

  • Facebook
  • Instagram
  • Pinterest
  • YouTube

Search this site

15 minutes is all it takes to… Clean out a draw 15 minutes is all it takes to…  Clean out a drawer, a cabinet, or quickly flip through your closet and grab a small bag of items you don’t need or want…  …and the impact of 15 min. rapid fire decluttering sessions adds up quickly, even after just a couple days!  Last night I cleaned out two drawers while the oven was preheating for dinner (did you see me in action on stories?) They were two drawers near our drop zone where things started to get stuffed and one of the drawers I use daily since I keep my notebook with the weeks meal plan, to-do lists, etc so it was driving me nuts that it was getting to be a chaotic mess.  So I set my timer for 15 min. to tackle it and not only did I get that one drawer done, I got the drawer next to it done and everything that didn’t belong in the drawers put away in its proper place!  The moral of the story is, you don’t have to set aside entire afternoons to clear the clutter and get organized. It can be done ones 10-15 min. session at a time.  So that’s what I’m doing. I’ve committed to a short decluttering session every day for the next week or so.  Join me! Give me a thumbs up if you’re in!  #declutter #declutteringtips #decluttering #takebackmyspace #organizedspaces #organization #organizingtips #homeorganization #clearouttheclutter #cluttercontrol
Just when I thought I couldn’t take any more of Just when I thought I couldn’t take any more of what 2020 has had to offer it’s continued to come in full force. The Rona 😷 has officially infiltrated our home (my husband has it) which put me into panic mode 🥺 trying to get everything for Christmas totally ready and all my biz stuff wrapped up for the year knowing I’ll probably get sick too.⁠
⁠
Then to top it off something broke with our sprinklers in the front yard and they wouldn’t shut off. Thankfully I noticed right away and my amazing gardeners came over to help fix it but with the sun going down and not having all the parts they needed, and a bigger problem than we thought we have been without water. —They came back first thing this morning though (did I mention they’re awesome) and fixed everything up so I get to turn the water back on in about an hour and oh man is it going to feel good to take a shower (and a deep breath).⁠
⁠
So far me and the kids don’t have any symptoms so I’m staying focused and getting all my to-do’s done so I can go into next week ready to enjoy Christmas in total quarantine and have time to get sick if that’s what’s coming my way.⁠
⁠
It’s the weirdest thing to be planning to get sick, but it’s where I’m at! Hahaha!⁠
⁠
Hope you are all staying healthy (and sane)!⁠
⁠
⁠
#carona #christmas2020 #whatayear #christmasdecor #easychristmasdecor #peepmypad #colorfulchristmas #boldhues #interiorstyling #makeyousmilestyle #stellarspaces #makehomeyours #heytherehome #interiors4all #homedecorideas #houseandhome #howihaven
The view of our tree from every room downstairs is The view of our tree from every room downstairs is my favorite!
#verymerrychristmashometour #christmastree #christmasdecorating #christmas2020 #holidaydecorating
Today I want to tell you why I started sticking to Today I want to tell you why I started sticking to a color palette in my own home.⁠
⁠
It wasn’t just because it allowed me to make quick decorating decisions, work with decor I already owned, and stay within my budget.⁠
⁠
✔️It's because color is the fastest way to create a look that flows from one room to the next and make my home feel really good.⁠
⁠
My home definitely didn’t get to where it is today overnight, but if I had to narrow it down to THE ONE THING that catapulted me in the right direction with my decor it’s when I finally figured out COLOR. ⁠
⁠
A thoughtful color scheme can create a nice flow from one room to the next, which is great, but color is also scientifically proven to affect your mood. ⁠
⁠
WHEN YOUR HOME FEELS GOOD, YOU FEEL GOOD!⁠
⁠
Let me ask you...👇🏼⁠
⁠
💭How do you currently feel in your home and how do you want to feel?⁠
⁠
Think about it for a second.⁠
⁠
💭Is the way your home feels now holding you back from the way you want to feel, things you want to do, or people you want to spend time with?⁠
⁠
I know there’s a bigger reason behind creating a beautiful home you love.⁠
⁠
And I bet it has nothing to do with impressing guests.⁠
⁠
Maybe for you it’s creating a space to really recharge, spend more time with family and friends, or to inspire more creativity.⁠
⁠
So what is it for you? Tell me in the comments.⁠
⁠
⁠
P.S. I'm hosting a free color class on Thursday! You can RSVP by clicking the link in my bio or go to colormadeclear.com/color⁠
⁠
⁠
#hygge #mytrendyroom #myokstyle #howihaven #dshome #homedecorideas #houseandhome #darlinghome #interiorstyling #ggathome ⁠
#inmydomaine #howwedwell #interior4u #interiormilk #interiors4all #lovewhereyoudwell #makehomeyours #showyourhomestyle #stellarspaces #mycollecteddecor #stylemyhomelikeaboss #styleitpretty #sharemysquare #makeyousmilestyle ⁠
#paint #paintcolor #paintcolors #colorfulhome #sherwinwilliams #behr
I read this morning that you are the culmination o I read this morning that you are the culmination of the 5 people you spend the most time with...⁠
⁠
...hmmm...does that mean I act like a 7 and 10 year old cause lord knows we've been together A LOT lately? 🤣🤣🤣⁠
⁠
But really, joking aside, are you intentional about who you surround yourself with?⁠
⁠
Do they light you up, inspire you, and teach you things?⁠
⁠
As uncomfortable as it is sometimes, I'm a huge fan of surrounding myself with those who know how to do things I want to learn. (And of course I'm a huge fan of spending time with people who I can share my know how with too.) ⁠
⁠
So now the question is, who are you becoming?⁠
⁠
Just something to marinate on today...⁠
⁠
⁠
#wednesdaywisdom #wednesdaymotivation #coastaldecor #blueandwhitedecor #finditstyleit #homestyle #homewithrue #makehomeyours #purposeinstyle #homesohard #collectedhome #cozyhome #myinteriorsquares #ourspaceourplace #colorismyjam #colormyhome #myboldhues #brightspaceswelove #interiorswithpersonality #crashbangcolor #crashbangcolor #brightboldhome #coloryourlife #printspatternstexturesohmy #mypopofcolor
Today I woke up and felt filled to the brim with g Today I woke up and felt filled to the brim with gratitude. 💖 I wanted to say thanks to you guys, my followers, my community, my loyal students and customers. Balancing everything (kids at home, life, business) this year has been challenging, but there's been so much growth and without you this little 'ol business of mine wouldn't be here. So cheers to you!⁠
⁠
⁠
#mondayfeels #mondayvibes #coursecreator #onlinebiz #homedecorblogger⁠
#inmydomaine #howwedwell #interior4u #interiormilk #interiors4all #lovewhereyoudwell #makehomeyours #showyourhomestyle #stellarspaces #mycollecteddecor #stylemyhomelikeaboss #styleitpretty #sharemysquare #makeyousmilestyle
My whys right there👆🏽 . We're evolving into My whys right there👆🏽 . We're evolving into a new phase where these two are helping out more and more around here and I'm loving that they take a certain pride in our space. ✨⁠
⁠
Of course we've got a set up that allows lots of play, messes, and "chill time" as my 7 year old calls it...⁠
⁠
...and although they may not be able to pin point it, I can tell that they too feel really good in our home and keeping it organized and feeling good, makes them feel good. ⁠
⁠
Creating a home you want to be in takes time, but with smart choices and a little patience it can happen.⁠
⁠
💖How do you want your home to feel?⁠
⁠
⁠
#decortips #decoratingtips #hometips #tips #tips4decor⁠
#finditstyleit #homestyle #homewithrue #makehomeyours #purposeinstyle #homesohard #collectedhome #cozyhome #myinteriorsquares #ourspaceourplace ⁠
#coastaldecor #coastal #coastalliving #coastalstyle #coastalinteriors #coastalhome #coastaldesign #coastalvibes #coastalhomedecor #californiastyle #californiavibes #liveboldly
Hey There, Home

Copyright Hey There Publishing, LLC © 2021 ·