How To Make A Simple Wooden Plant Stand – No Power Tools Needed
I love the look of a high-end outdoor wooden plant stand, but the price tag? Not so much. So I got creative and today, I’m showing you how to make a DIY wooden plant stand that looks designer but costs a fraction of the store-bought version!
Even if you’ve never picked up a power tool before, don’t worry - this simple woodworking project is totally beginner-friendly. You’ll only need a few basic tools and supplies to whip up a DIY plant stand for outdoors that’s sturdy, stylish, and seriously impressive.
And that's not all… Stick around to the end of the post, because I’m also linking up 4 more amazing West Elm-inspired DIY projects to help you refresh your entire outdoor space on a budget!

In This Article:
Budget-Friendly Wooden Plant Stand DIY: My Simple Approach
A lot of times when I'm doing a knock off, I get too hung up on the details. Truth is, I'm not a carpenter. There were details on the inspiration plant stands that I wasn't going to be able to get by using a simple tools and materials list and I really wanted this project to be one that almost anyone can do.
So I simplified my plant stand plans and still was able to create some very pretty and simple wooden plant stands that have instantly made my potted plants look beautiful and added a ton of style to my outdoor living space.
They don't have the exact details of the inspiration but at less than $10 a stand compared to over $125 for the original I'll take mine any day!
Choosing The Right Wood for Your Plant Stand
I chose pine for my wooden plant stand because it’s simple to work with, easy to find, and very inexpensive. Plus, living in Southern California where the weather is pretty mild year-round, I don’t have to worry much about weather damage.
When it comes to choosing the best wood for an outdoor plant stand, you’ve got a few good options: cedar, teak, and pine are all popular picks. Cedar and teak are naturally weather-resistant and super durable, but they can also be pricey, especially if you're building multiple stands.
How To Build A DIY Outdoor Plant Stand
(Psssst: Did you know that you can order everything you need for this project online at HomeDepot.com (following the links below) and pick it up in the store within hours? No more walking around getting irritated!)
Materials and Tools:
This post contains affiliate links for your convenience. Read the full disclosure.
(This project doesn't require any large power tools. However if you'd prefer to use a miter saw, you definitely can!)
- Hack saw or electric saw
- Drill + drill bits
- Kreg jig pocket hole system
- ¼ inch wooden dowels / dowel pins
- Wood glue
- 1x2 pine (I bought a 6 foot piece for both stands.)
- ¾ x ¾ square hardwood (You'll find these in various lengths in the middle of the hardwood lumber aisle at Home Depot.)
- Outdoor stain- I used MinWax in Dark Walnut
- (Optional) - 200 grit sand paper or orbital sander to smooth your wood pieces

Your home doesn’t feel off because you need more stuff.
Grab my free guide to spot the 5 decorating mistakes that make a home feel scattered, mismatched, and not quite right.
Step-by-Step Tutorial For DIY Wooden Plant Stands
Note: The actual measurements you use will be based on the size of the pot your plant stand will hold and how tall you want your finished plant stand to be.
Step 1: Cut the wood for the plant stand leg pieces
- Cut 4 pieces of wood for the legs from the ¾ x ¾ square hardwood and set aside. I cut my legs the same height as the pot that the stand would hold.
Step 2: Cut the wood for the plant stand base pieces
The base or platform will be cut from the 1 x 2 pine and consist of 3 pieces of wood that form an X to hold the potted plant up.
- Piece A: Cut one piece the desired width of your plant stand (the widest part of your pot.)
- Piece B and C: Cut a second piece the same as piece A minus the thickness of piece A. Then cut that piece in half to get piece B and C.

Step 3: Drill holes for the base piece dowels
- Mark the exact middle of piece A and drill 2 pilot holes (the size of your wooden dowels) through the piece of wood.
- Line one end of piece B up with your holes and mark them using a pencil. Then drill holes into your marks deep enough for your dowels to go half way in.
- Repeat with piece C creating holes on one end.

Step 4: Drill pocket holes for leg pieces
You're going to create pocket holes on the under side of your base where the legs will attach.
- To start, with a kreg jig, drill pocket holes on the edge of each short piece of your base (on the opposite end of your dowels) and on one edge of both ends of your long pieces.

Step 5: Assemble the base piece
- With a small amount of of wood glue place your wooden dowels into your shorter pieces, then again into your long piece on both sides to create an X making sure all pocket holes are on the same side.
Once you've assembled the base piece and drilled pocket holes, your wooden plant stand it will look like this.

Step 6: Determine the height of your plant stand base
The placement (height) of the base/platform of your plant stand (the x you just made) on the legs will depend on the size and shape of your pot.
- To determine the height, hold your platform with one leg on 2 opposite sides in place and have a buddy hold your pot in place so you can see where you want the top part of each leg piece to touch your pot. As you raise and lower the platform you will see that the point of contact between the top of the legs and the pot changes.
- Once you like the look, mark the bottom edge of the platform on one leg.
- Then line all of the legs up and mark all of them. (The left portion will be the amount of wood going up the side of my pot, the right portion will be the legs.)

Step 7: Attach the leg pieces
- Place a small amount of wood glue on the end of one of your platform pieces.
- Lay one leg flat and line up the end of the base piece with the marks you made making sure the pocket hole is facing the bottom of the leg.
- Using a kreg screw (pocket hole screw), attach the base to the leg piece and repeat for all legs.
- Wipe any glue that seeps out with a damp towel. (If you don't the wood won't absorb stain there.)
- Clamp your plant stand and let it sit overnight.

(optional) Step 7: Stain your outdoor plant stand
You took the time to build a plant stand and if you're going to use your planter stand outside you'll want to make sure they hold up to the elements and add a coat of outdoor wood stain.
To keep the wood nice and give your plant stand a coat of stain or paint. (I used MinWax in Dark Walnut.)

Now all you need to do is add beautiful plants to add to the pots on your DIY outdoor plant stand!

You May Also Like


Create a Home You Love, One Project at a Time
With just a few simple tools and a modest budget, you can create a wooden plant stand that looks high-end, feels totally custom, and shows off your greenery. A few steps, a bit of elbow grease, and boom - instant patio upgrade!
And if you’re loving these easy DIY wins, you’ll definitely want to check out my project on Replacing Stair Spindles - An Easy DIY Staircase Makeover. It's another simple project that makes a huge difference!
Bonus: 4 More West Elm Knockoff Projects You'll Love
Now it's time for even more amazing West Elm-inspired DIY projects from some very talented ladies! Use the links below this image to be taken to all the details of these gorgeous projects!
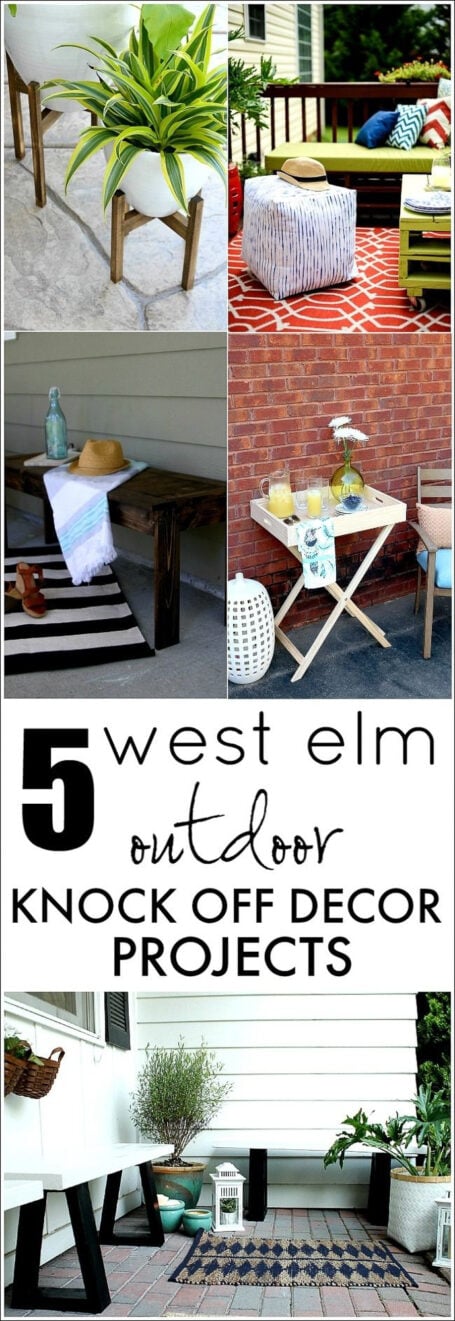
- HEY THERE HOME - WEST ELM INSPIRED WOODEN PLANT STAND (you are here)
- PLACE OF MY TASTE -WEST ELM INSPIRED STRIPED POUF
- MAKING HOME BASE - DIY WOOD SLAT BENCH
- JEN WOODHOUSE - DIY BUTLER STAND
- HOME MADE BY CARMONA - DIY WEST ELM BENCH KNOCK OFF

P.S. What if I told you there's a whole new (and way easier) way to decorate your home—without the overwhelm, indecision, or endless Pinterest scrolling.

Inside my online decorating program, Style Your Way Home, I'll walk you through the process of discovering and defining your decorating style, creating a home decor plan, and show you how to apply it in any space so each room is unique while maintaining a cohesive look that feels like YOU! - When you join now, you'll get direct support from me... it's like having a design BFF in your back pocket!
