How To Replace Wood Staircase Spindles With Iron Balusters
You know that one spot in your house that quietly drives you nuts? For my friend Leah, it was the staircase. Specifically, the staircase spindles. The wood was dated, the paint was blotchy (hello, mystery drip marks), and the whole thing just clashed with the home decor style she wanted. The staircase was supposed to be a welcoming focal point, not a reminder of an old DIY gone bad.
So when she called me up for help, I knew exactly what we were going to do: replace those tired wood spindles with sleek iron balusters. It was faster and easier than either of us expected, and the transformation? Total game changer.
If you've been itching to replace banister spindles or just want your staircase to feel more like you, you're in the right place. I’m sharing the simple steps we followed so you can pull off a staircase makeover too - no contractor required.

In This Article

Your home doesn’t feel off because you need more stuff.
Grab my free guide to spot the 5 decorating mistakes that make a home feel scattered, mismatched, and not quite right.
What You'll Need To Replace Staircase Spindles
This post contains affiliate links for your convenience. Read the full disclosure.
Tools
- Reciprocating saw to remove wood spindles (you could use a hacksaw but it will take longer and require more muscle)
- Needle nose pliers to remove nails
- Electric sander (optional)
- Sand paper
- Drill with wood paddle bit (Size will depend on the size of the balusters you install)
- Caulking gun
- An electric miter saw with a metal cutting blade (you could use a hacksaw but it will take longer and require more muscle)
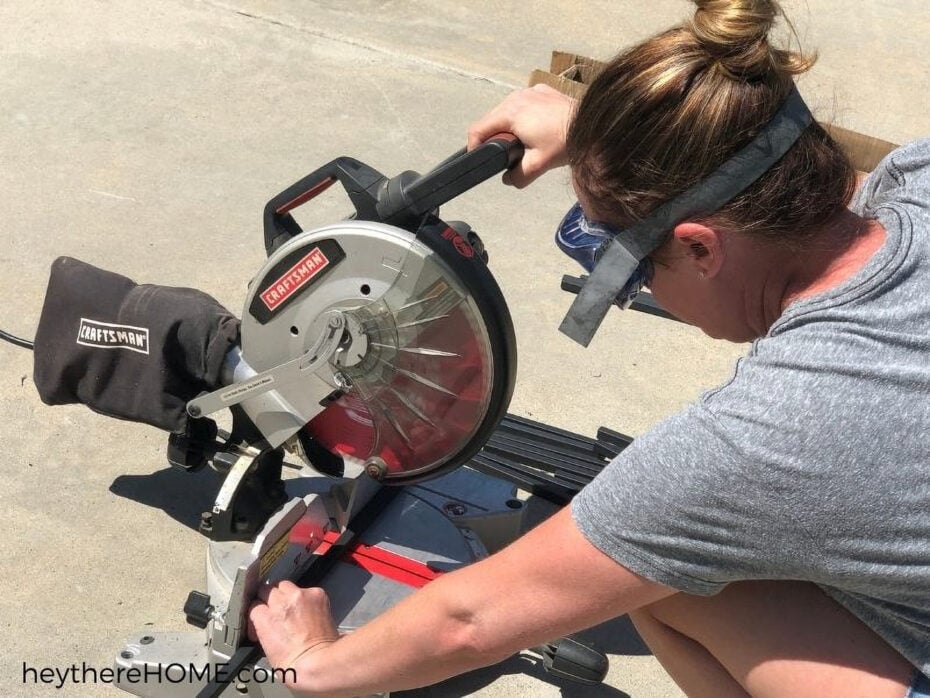
- Full seal safety goggles: full seal goggles are the ones that go all the way to your skin. This is really important for this project because small pieces of metal will be coming at you when you cut your iron balusters.
- Small allen wrench to tighten baluster shoes (our baluster shoes came with the right sized allen wrench)
Supplies
- Iron Balusters: We installed one decorative iron baluster every fourth baluster to add interest. (Both are hollow and easy to cut.)
- These are the plain square iron balusters we installed.
- These are the decorative iron balusters we installed.
- Metal baluster shoes: some flat and some angled (count how many flat or angled ones you'll need)
- Sand Paper
- Painter's tape
- Paint
- Liquid Nails
How To Replace Staircase Spindles With Iron Balusters (Step-by-Step)
Step 1: Remove old spindles from staircase
Removing the old wooden balusters was really fast and fun.
Run your reciprocating saw carefully through the middle of each spindle. Some will fall out and others need a gentle wiggle. Be sure to lift the bottom of the old balusters out to preserve the edge of the existing holes.
Pull out any nails left behind by the spindles with needle nose pliers.

Step 2: Clean up the holes in the base rail or drill new ones
If you have existing holes, clean out any leftover glue or debris and place one of your new iron balusters in the hole to make sure it's the right size. it should fit snuggly, but not too tight.
If you need to make the baluster holes bigger or create holes, first mark the depth of the hole by placing painter's tape around the wood paddle bit. Using a drill and a wood paddle bit, drill your holes making sure to stay plumb (straight up and down) so you don't have crooked holes.

Step 3 (optional): Refresh the staircase railing posts, and base rail (board under the balusters)
Replacing the entire stair railing wasn't in the budget, but that didn't mean we had to live with it. We sanded it down to original wood and gave it three smooth coats of gloss white paint. This gave the stair railing a fresh clean look without the expense of replacing it, plus it's easy to maintain - just wipe it clean!
We used a paintbrush for the railing and posts and a 3 inch dense foam roller for the base rail to keep brush strokes minimal and the finish smooth.
Tip: your first coat of paint can be decently thin. After that be sure to have enough paint on your brush to give a nice coat and the brush marks will even themselves out. Let each coat dry completely. Use a fine grit sand paper and lightly sand and clean your surface before the next coat of paint.
Important: let the paint dry and fully cure (overnight is best).
Step 4: Measure for new iron balusters
Measure from the hole in the base rail to the hole in the hand rail and add one inch.
Tip: Many of your balusters will be the same length, but there may be sections of your banister that differ in baluster height. It’s a good idea to take the measurement in a few different places along a section to make sure.
For plain iron balusters, measure from one end and mark your cut with a pencil.
For the iron stair balusters with decorative detail, you'll need to first determine the height you want the detail to be. This may require you to make cuts on both ends to keep the height consistent.
For example we wanted our decorative detail to be in the center, so we first determined how much we needed to cut off of each baluster and divided it by 2. Then we cut that amount off of each end to keep the detail in the center.
Step 5: Cut iron stair spindles
Put your full seal safety goggles on and using a saw with a metal cutting blade, cut each metal spindle along your mark.
A couple tips:
- It’s best to do this in an area that can be fully swept and hosed down after your project. There will be little shards of metal that you’ll want to clean up completely. We did our cuts in the driveway and it was perfect.
- We worked in sections, making cuts and installing the plain balusters for the top hallway rail first. Then we made cuts and installed the detailed balusters for this section before moving onto the angled stair section, working on the plain balusters first, and then the detailed balusters.
Step 6: Place the baluster shoes
For the flat baluster shoes, slide two shoes to the center of each baluster. Make sure the bottom of each shoe is facing the end of the baluster (the part that will go into the hole). Use painter's tape to temporarily hold them in place and keep them out of the way while you install the balusters.
For the angled baluster shoes pay extra close attention! Slide two angled baluster shoes to the center of each baluster, making sure the bottom of each shoe is facing the correct end and that the angles are going in opposite directions to mimic the angle of the base rail and the hand rail. - We messed up on one of these and didn't realize until it was dry so we had to cut it out and do it again. Learn from our mistake!

Step 7: Insert and secure the new balusters
Tip: If you’re installing a decorative baluster every couple of balusters, count out which holes will have a decorative baluster and place a small piece of painter’s tape next to the base rail hole to mark which ones will be decorative.
The cutting was the scariest part of this project but installing the wrought iron spindles was surprisingly easy.
Once you have your iron stair spindles cut, squeeze liquid nails into the hole in both the base rail and the hand rail about ⅓ full.
Then slide the top of the baluster into the handrail hole pressing upward to allow the bottom of the baluster to clear the base rail and go into the base rail hole.
Adjust your baluster so it's facing the direction you want it to. (If you're installing square iron balusters, be sure to stand back every few and make sure they're even.)
Once the liquid nails dries, you won't be able to make any adjustments!
Let the liquid nails dry and set overnight.
Step 8: Tighten the baluster shoes in place
Once everything is dry and set, remove the painter's tape holding the shoes in the center of each baluster, slide them in place and tighten with an allen wrench. (The allen wrench often comes with the shoes you order.)
Tip: There was a small section of the staircase base rail that didn’t exactly line up with the angle of the baluster shoe. To remedy this, we positioned it as best we could and filled in the gap with a dab of black caulk.

The Final Result Of Leah's Staircase Makeover
When we stood back and looked at Leah’s staircase after installing the new iron balusters, the difference was dramatic The new iron balusters with the freshly painted banister created a beautiful focal point for this open space; her entryway instantly felt more updated while still allowing her to mix in the style of her older pieces as well!

The other final touch we completed was capping the two bottom stair ledges (the same way I capped the half wall in my own home) to match the top ledge. This simple update completed the look and makes dusting the ledges much easier. We didn't start this project knowing how to install balusters but I'd say we pulled it off quite nicely.
You May Also Like


Designing a Room That Functions (Beyond the Staircase)
Replacing stair spindles is a great visual win, but why stop there? If your home isn’t functioning the way you want it to, now’s the perfect time to take a step back and reimagine your space.
Whether it’s a living room that’s more cluttered than cozy or a bedroom that just doesn’t feel restful, this post will help you design a room that functions exactly the way you need it to - starting with how you want it to feel.


P.S. What if I told you there's a whole new (and way easier) way to decorate your home—without the overwhelm, indecision, or endless Pinterest scrolling.

Inside my online decorating program, Style Your Way Home, I'll walk you through the process of discovering and defining your decorating style, creating a home decor plan, and show you how to apply it in any space so each room is unique while maintaining a cohesive look that feels like YOU! - When you join now, you'll get direct support from me... it's like having a design BFF in your back pocket!
Frequently Asked Questions - DIY Stair Railing Makeover
What is a baluster?
A baluster is the vertical piece of a staircase that helps support the hand rail between larger posts and close the gaps between posts for safety. Balusters are often decorative and are most often made out of wood or metal.
What is the difference between balusters and stair spindles?
Balusters and spindles are used interchangeably but often when made from wood with detail you'll hear them referred to as railing spindles, wood spindles, or iron spindles.
What was the cost to replace the wooden balusters with iron balusters and update the stair banister?
The cost of your staircase makeover will depend on how many balusters you need to replace, the cost of the balusters you choose, whether you plan to replace the stair railing or update the stair railing without replacing it (like we did.)
In Leah's makeover, the cost to replace the stair railing with a new stair railing was prohibitive. The best option here was to go with a white banister with iron spindles. She spent about $870 on supplies not including touch up paint and caulk.
