How To Make A Large Cork Board Wall
Did you ever make your parents crazy by taping or pinning posters, art, and photos to your walls as a kid?
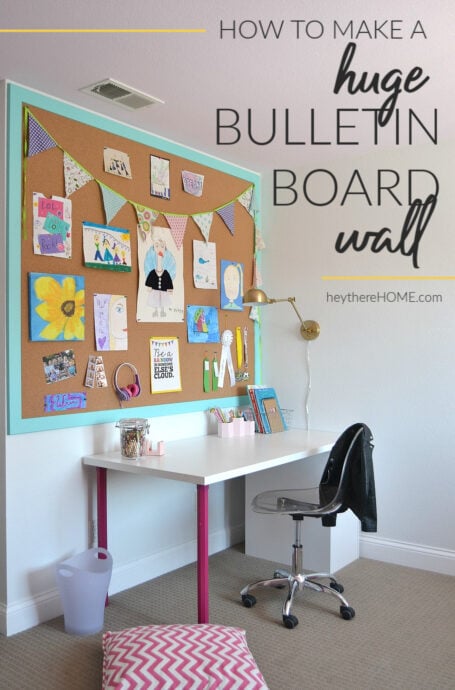
My daughter started doing that a few years ago so when it came time to redo her room, giving her a good place to display her art, certificates, and photos was a must and this huge cork board wall is just perfect for that!
I love that it gives her the opportunity to display her things without ruining the walls and have a feeling she'll use this large bulletin board as a display space for years to come. - Always a bonus when your kid's room grows with them 🙂
Today I'll show you the easy steps to make your own DIY cork board wall so you can give your kids a display space or make a bulletin board for your office.
In This Post:
Supplies For A Huge Cork Board Wall
This post contains affiliate links for your convenience. Read the full disclosure.
- 1x2 MDF board to frame your cork board tiles
- Paint to paint the MDF frame (I used Behr Marquee Key Largo)
- Cork foam boards: I found these on Amazon and they come in 2 sizes. You'll need to plan out the size of your DIY bulletin board to decide how many and what size you need.
- Spray adhesive
- Underlayment boards
- Wood screws
- Finishing nails
- Spackle

How to Make A Large Cork Board Wall With A Frame
This is a really easy project that can be completed in just a few hours.
Before you begin, you'll need to decide how big you want your DIY bulletin board to be and take measurements, making sure to allow space for your bulletin board frame to go around the edges.
Step 1: Make the frame for your giant bulletin board
- Cut your MDF boards to make a frame for your cork board wall cutting each corner at a 45 degree angle.
Tip: It’s best to lay out your pieces in the shape of your finished bulletin board and mark each cut with a pencil to ensure you make your 45 degree cut correctly. You’ll have to adjust your saw depending on the side of the bulletin board frame you’re cutting.

- Once you've cut your bulletin board frame pieces, give them a nice coat or two of paint in the color of your choice.

- Once the paint is dry, start by attaching the top piece of your bulletin board frame using finishing nails, making sure that it's level.
- Next, attach the side pieces, making sure they're plumb and create a 90 degree angle at the corners.
- And finally, attach the bottom piece of your bulletin board frame.

Step 2: Prepare your wall for cork tiles
In order to not destroy the wall behind the cork board, we decided to use underlayment between the cork tiles and the wall. This will save us from having to retexture the wall in the event we take the cork board wall down at some point.
- Cut pieces of underlayment to (mostly) fill the inside of the frame you've installed.
- Using wood screws, attach the underlayment into studs whenever possible so that it doesn't bulge.
Tip: These cuts don’t have to be perfect. None of the gaps you see below will be seen in the finished bulletin board.

Step 3: Cut cork board tiles to create a giant bulletin board
- Plan out the cuts of your cork board tiles depending on the size of your cork board wall and the size of the cork tiles you're using.
- Once you're ready to make cuts, mark the front side of your cork tiles. Using a straight edge (metal is best), run your utility knife down the side of your straight edge repeatedly to score the cork. Each time you run your utility knife down the line, your cut will get deeper.
- Once you've gone through the cork board tile you'll be able to bend it and reveal a nice clean cut, but the back (paper portion) will still be intact.
- Flip the cork board over (paper side up). Bend it paper side in and run your utility knife down the seam to cut the paper portion of the cork board.
- Repeat these steps for the rest of the cuts you need.

Does Decorating Feel Confusing? - It's because you're starting in the wrong place.

The secret isn’t more inspiration - it’s a clear plan.
Grab my free Function First Decorating Guide and learn the simple first step that makes every decorating decision easier.
Step 4: Install the cork board tiles
You'll need to work quickly because the spray adhesive dries quickly!
Tip: I started in the corner that used whole cork tile pieces first and worked my way across the bottom of the bulletin board to minimize the number of cuts needed.
- Lay out the cork board tiles according your your plan and attach them starting at any corner.
- Grab a cork tile and spray the back side (paper side) with a generous amount of spray adhesive then immediately spray the section of the underlayment it will attach to. Be sure to focus on the corners and edges of your cork tile.
- Press the cork tile into position and hold for about 30 seconds before moving on to your next tile.
- When placing your next tile, be sure to place it really close together to minimize the appearance of the seams. - Don't worry if you can see a line between each tile. Once you put your art, photos, and memorabilia up, those seams won't be noticeable.
Let your cork board wall dry over night before getting creative and adding your items with push pins!

Large Cork Board Wall To Display Kid's Art, Photos, and Memories
This large cork wall is a perfect place for my daughter to display her art, certificates, ribbons, and photos and, like the rest of her bedroom decor, can be changed out easily as she grows up!


Right now it's a perfect spot for her to sit and get creative, but as she grows I'm sure it will become filled with photos, magazine clippings, and memorabilia without marking up the walls in her room - which makes this mom really happy.
You May Also Like


P.S. What if I told you there's a whole new (and way easier) way to decorate your home—without the overwhelm, indecision, or endless Pinterest scrolling.

Inside my online decorating program, Style Your Way Home, I'll walk you through the process of discovering and defining your decorating style, creating a home decor plan, and show you how to apply it in any space so each room is unique while maintaining a cohesive look that feels like YOU! - When you join now, you'll get direct support from me... it's like having a design BFF in your back pocket!
