DIY Bed – Built in Bed With Drawers, Shelves, and Reading Nook
See how we built this DIY bed for our girl's bedroom. This DIY platform bed with drawers, shelves, and a reading nook saves so much space in her room and creates a beautiful focal point.
I'd say the main part of our girl's bedroom makeover is the DIY bed we built for her.

Your home doesn’t feel off because you need more stuff.
Grab my free guide to spot the 5 decorating mistakes that make a home feel scattered, mismatched, and not quite right.

Her room is rectangular in shape and she doesn't have a lot of wall space so in order to give her all the clothes and toy storage she needs and still be able to have space for her art/ homework table and large cork board wall we had to figure out a way to get rid of her dresser.
Putting drawers under her bed was definitely the answer, but I couldn't find the exact right bed with storage so I decided to design and build it myself.
Now, I'm not a woodworker by trade, but I've been able to create beautiful built-ins in our home and used those same steps and store bought drawer units from IKEA to create this built in bed with the skills I have.
You May Also Like


I swear, if I can do this project - by myself I might add, you can too and today I'm going to share the step-by-step process with you so you can build your own DIY bed and add a ton of function and character to a bedroom in your home.
Supplies For This DIY Bed:
This post contains affiliate links for your convenience. Read the full disclosure.
- Nordli modular drawers (IKEA)
- These drawers come in different widths and number of drawer configurations. Be sure when you purchase you don't purchase the top, cause you don't need it and it will save you money.
- I took the width of the wall the built in bed would be on and played around with the drawer configuration to get as many drawers as possible. It's okay if it's not an exact fit, I'll show you how to fill in the sides with panels to complete the built-in look.
- I used three 31.5 inch drawer units, and one 15.75 drawer unit.
- 2 x 2 furring strip for bottom frame
- White melamine panel boards for the platform bed
- ¾ maple plywood (4 x 8 sheets) for shelving units
- 1 x 2 birch board for trim on shelves and along top and bottom of platform bed frame
- trim for platform bed side panels and along back wall
- 2 x 4 wood for platform bed wall brace
- ¾ inch birch board for platform bed side panels
- IKEA connector bolts- drawer units may come with these (they're specific to IKEA furniture) but to be safe pick up a few near the return counter at IKEA.
- 18-gauge 2 inch nails (use with nail gun)
- 1 ¼” Kreg screws
- Wood glue (my fave is Titebond)
- Wood putty
- Paintable caulk (my fave is Dap)
- Tube of plastic wood
- 2" and 4 " wood screws
Tools:
- Measuring tape
- Level
- Drill
- Drill bit holder /drive guide
- 18-gauge nailer (with portable compressor)
- Kreg Pocket Hole Jig with clamp
- Miter saw (10” is fine for most of the project, but you’ll need a 12” or larger for the crown molding.)
- Kreg Crown Pro Jig
- Nail punch
- sand paper – fine grit
- Caulk gun
- Paint brush - this is my favorite one
- Foam roller
How To Build A Platform Bed Using Nordli Drawers As A Base
Using Ikea drawers as a base for you bed will get you the under bed storage you need and be less work.
Measure for your built in bed
Like I said, your measurements will depend on your space, the size of the mattress, how deep you want your headboard shelves and how big you want the reading nook.
To start:
Definitely start by taking measurements of your overall space (wall to wall) and the length and width of your mattress since these are the two measurements that can't change.
You'll want to add about 2 inches to the length and width of the mattress measurement to allow for bedding to be tucked in.
Headboard shelves:
For the headboard shelves, I'd do a minimum of 8 ½ inches deep (what we did) but if you can do 10 inches deep, I think you'll get more use out of the shelves.
Reading nook shelves:
Any space left over at the foot of the bed will be your reading nook. You'll want the bench area to be big enough to curl up and read even with pillows behind you, so you won't want to make the shelves too deep.
To give you an idea, our platform bed frame is 41 inches deep (from wall to edge of bed) and the shelves at the foot of the bed are 12 inches deep which left 28 inches (depth) for the bench cushion.
PART 1: Building the platform bed
Step 1: Assemble the Nordli drawers according to the instructions
- Place them side by side and note the length of your drawer units and their depth.
Step 2: Build a base/ riser
Lifting the drawer unit off the ground a few inches will make opening the drawers easy (especially if your room has carpet) and create more of a built in look.
The front piece of the base will run the length of the entire unit (wall to wall) while the rest of the base will support the edges of your drawer units.
- CUT A - Cut one piece of 2 x 2 furring strip the length of the entire unit (wall to wall)
- CUT B - Cut one piece of 2 x 2 furring strip the length of the drawer units
- CUT C - cut 2 pieces of 2 x 2 furring strip the depth of the drawer unit minus 4 inches
- Place A and B on the ground and position C between the two long pieces with even amounts of overhang on either end of A.
- Pre-drill holes and attach pieces with a wood screw.

Step 3: Dry fit your base
You may need to cut your existing baseboard to create a notch for your built in bed.

Step 4: Make side panels for your platform bed unit
To fill in the extra space on either side of the drawer units we need to create side panels.
Tip: It’s best to give your cut pieces a coat of paint before assembling. It makes the painting process much easier.
- To figure out the width of your side panels take the length of your unit (wall to wall) minus the length of the drawers (side by side) and divide by 2.
- CUT D - Cut the ¾ inch birch boards the same height as the drawer units by the width you just calculated above.
- Using your Kreg Jig, drill 2 pocket holes on one long side of each side panel and attach the side panels flush with the front of the drawer unit on both ends. (When looking at the panel from the front, you'll see the drawer unit and the side panel, the panel won't cover the drawer unit.)

You May Also Like


Step 5: Attach the base/riser
Position your drawer units together AND upside down so the bottom of the drawer unit is facing up.
Line up the front edge of each drawer unit and hold them in place using clamps.
Lay the furring strip base on the drawer unit so the front of the base matches up with the edge of the metal drawer slides and the side panels you just installed. - The rest of the base should run along the edge of the drawer unit too.

- Pre-drill holes and attach the base to the drawer unit using wood screws. It's important that you pre-drill holes and take care to go through the furring strip (base) and into the thin walls of the drawer unit.

Step 6: Secure the drawer units to each other
- Carefully flip your drawer unit with base over so it's right side up and roughly put it in place.
- Double check that the front of each drawer unit is flush and use connector bolts to secure the drawer units to each other to add stability and reduce gaps between the drawer units.
Tip: Your IKEA drawer units should have come with connector bolts. If your drawer units didn’t come with connector bolts, you can find them (usually for free) at IKEA near the return counter. You can also use wood screws that go through the first drawer unit wall and into, but not all the way through, the second drawer unit wall.

Step 7: Add bottom trim
- CUT E - Cut 2 pieces of 1 x 2 birch board the length of your platform bed unit and attach to the base you created using a nailer. (The second piece will be attached in step 11.)

WARNING: You’ll see in the images below that I don’t have the trim piece I just had you attach installed. This was a mistake I made along the way so the way your project looks at this point will differ slightly from the photos below. Definitely attach that trim piece in step 7 first.
Step 8: Place your drawer units
- Place your drawer unit so the front of the drawer unit meets the baseboard notch. Your unit will have the bottom trim piece attached at this point so instead of pulling your unit forward to the base piece, you'll pull it forward to the trim piece.
- Double check the measurement from the back wall to the front of the drawer unit to make sure it matches your plan and accommodates the width of your mattress plus 2 inches for bedding. In our case we cut the baseboard at this measurement, so it was just a matter of pulling the drawer unit and base forward to the front of the notch in the baseboard.

🎉 Well done! Here's what it should look like at this point (but yours will have the bottom trim piece.)

Step 9: Back wall brace
- CUT F - Cut your 2 x 4 the length of your back wall minus a couple inches (to make it easy to get in place.)
- measure the height of the drawer unit and mark a level line along the back wall at the same height.
- Using a stud finder, mark your studs just above the line along the entire length of the wall.
- Line up the top edge of the 2 x 4 with the line you marked and attach to the wall with 4" wood screws making sure to hit each stud.

Step 10: Attaching the platform
- CUT G - Cut your melamine board the depth of your platform bed and the length of the entire unit.
- If your wall isn't perfectly square you may want to cut your melamine board the depth of your platform bed minus ½ to give you some wiggle room.
- I had my boards cut at Home Depot and needed them to fit into my SUV, so as you can see, I had multiple smaller pieces cut to all equal the dimensions I needed.
- Place your melamine board on top of your drawer units and the 2 x 4 wall brace so that the front edge of the melamine board lines up perfectly with the front of the drawer unit.

- Using wood screws, attach the melamine board along the back wall brace and into the drawer unit walls.

Step 11: Attach the top trim piece
- Run a small line of wood glue along the raw edge of your melamine board.
- Grab your other piece of trim (CUT E) and line up the bottom edge with the raw bottom edge of the melamine board and attach the trim piece with a nailer.
- **Note that the trim piece will stick up above the platform. This creates a small lip to keep the mattress from sliding around.

Step 12: Adding side panel trim
- You now have a slight gap between the side panel and baseboard and the side panel and the wall.
- CUT H - measure the distance from the top of the bottom trim to the bottom of the top trim and cut a piece of window/ door casing to fit. - The reason I chose window casing is because it's thicker at one edge. You'll want to choose a casing that has its thick edge almost fill the gap between the baseboard and the side panel.
- Attach with a nailer.
- Repeat on the other side.

PART 2: Building the shelves for the built in bed
We talked earlier about determining the depth of both your headboard shelves and the reading nook shelves. Keep in mind that you'll be adding trim to the front of the shelves that's ¾ inch thick so when cutting the wood for your shelves, take your depth and subtract ¾ inch.
The width of your headboard shelf unit will be equal to the depth of your platform bed.
The number of shelves and spacing is up to you. Definitely think about what you plan to put on the shelves to determine your spacing.
At the bottom of each shelf unit I put an 18 inch flat panel to act as a headboard on the headboard shelves and a place to lean up against on the reading nook shelves. If you plan to lean a pillow up against the headboard shelves when the bed is made you may want to make this panel a bit taller.
These shelves are very similar to the ones I built for the built ins in our sitting room. The only difference is the flat panel I added here. For more more details and more photo angles of this project including more detailed steps for the crown molding visit this post and scroll to the part where the shelves are being built.
For each shelving unit you'll need to cut:
- 2 side panels PIECE A: Cut the height of your shelf unit minus ¾ inch X depth of shelf unit minus ¾ inch.
- *Tip: leave 2 inches between top of shelf unit and ceiling to accommodate for crown molding.
- Front flat panel PIECE B: Cut desired height of flat panel minus ¾ inch X width of shelf unit minus 1 ½ inches.
- Interior shelves PIECE C (number of shelves is up to you): Cut width of shelf unit minus 1 ½ inches X depth of shelf unit minus ¾ inch.
- Top Piece PIECE D: cut depth of shelf unit minus ¾ inch X total width of shelf unit.
Step 1: Drill pocket holes for shelves
- Using the Kreg Pocket Hole Jig I drilled two pocket holes on the inside top edge of each side panel (A).
- I drilled two pocket holes on the inside side edges of the flat panel (B).
- I drilled two pocket holes on the underside of both ends of each interior shelf piece (C) (not including the top shelf, piece D.)
- There are no pocket holes on the top piece (D).

Step 2: Attach the flat panel (B)
- Lay one side panel (A) flat on the floor, pocket holes up.
- At the opposite end from the pocket holes/ bottom of side panel place your flat panel so the front side (without the pocket holes) is flush with the raw edge of the side panel and bottom edge is lined up with the bottom of the side panel.
- Attach using Kreg screws and the pocket holes you created.

Step 3: Attach the bottom interior shelf (C)
- Place your first interior shelf directly above the top edge of the flat panel so its raw edge is flush with the raw edge of the side panel and is square with the side panel.
- Attach it to the side panel using Kreg screws and the pocket holes you made at each short end of the shelf.
Step 4: Attach the top piece (D)
- Place the top shelf (D) next to the top of the side panel (A) so the raw edge of your top piece is on the floor and flush with the side of the side panel) and attached it with a Kreg screw using the pocket holes on the side panel (A).

Step 5: Attach the remaining interior shelves(C)
- Measure and mark the spacing for each shelf starting at the bottom shelf. Be sure you're marking where the top of each shelf will line up and mark both edges of the side panel to ensure your shelves are installed straight.
- Hold each interior shelf in place, pocket holes facing the bottom of the shelf unit, making sure both sides match up with the marks you made (double check that your shelf is square) and attach using Kreg screws and the pocket holes you made.
- Repeat this for each shelf.
* Be careful because at this point the shelves are flimsy.

Step 6: Attach the second side panel (A)
- Lay your second side panel (A) flat on the ground, pocket holes facing up, and carefully flip your partially built shelf unit over so the top shelf edge (D) touches the floor and the raw edge of the side panel runs along the edge of the flat panel.
- Attach the side panel to the flat panel first, using the pocket holes on the inside of the flat panel, and double checking that everything is square.
- Measure and mark the same measurements for each shelf and attach using the pocket holes you already created on the underside of each interior shelf working your way up to the top piece, which attaches using the pocket holes you made on the side panel.
Repeat steps 1-6 for your other shelf unit.
Step 7: Place your shelf units and secure to the wall
- Place both shelf units on the platform bed.
- Secure to the wall by screwing through the side panel closest to the wall and into the wall.
- *Double check to make sure the unit is plumb and level. You may need to use wood shims if your wall isn't square.
- Don't worry about small gaps; we'll be caulking for a perfectly finished look.

Step 8: Add vertical trim pieces
- Cut 1 x 2 birch wood the length of each vertical side minus the top shelf.
- Place a bead of wood glue down the raw vertical edge of the shelf unit.
- Line up the outside edge of the shelf unit with the edge of the trim and attach using a nailer.
- Repeat on wall side placing the edge of the trim as close to the wall as possible while keeping it plumb.
- Repeat on other shelf unit.

Step 9: Add horizontal trim
These trim pieces are what make your shelves look substantial and really finished.
- You'll want to measure and cut each horizontal trim piece for each shelf individually because each one will be slightly different cause of how your vertical trim piece was placed next to the wall.
- Cut each piece from 1 x 2 birch wood, place a bead of wood glue along the raw edge of the interior shelf and line up the top edge of the trim with the top of the shelf. Attach using a nailer.

Step 10: Add crown molding
- Measure and cut your crown molding. I followed the instructions on my Kreg Crown Pro to get the right measurements and angles.
- I used a 3" crown molding which makes using a 10" miter saw a bit tricky. The first time I did a project like this I rented a 12" miter saw, but this time I was able to make the cut with my Kreg Crown Pro by lifting the guard on my saw. -- Not ideal, but it saved me some money.
- Attach the crown molding

The Finishing Touches On This DIY Bed
Once you have everything in place and secured you'll have a lot of small gaps and holes. The key to a beautiful built-in look (and your new best friend) is caulk, wood putty, and Spackle.
I put these steps in a specific order to save you time.
Filling in pocket holes
- Fill each pocket hole with plastic wood and smooth as best you can. Once it's completely dry, sand it smooth with fine grit sand paper.
Warning: Be sure not to do any sanding when you have wet plastic wood, caulk, Spackle or paint on your shelves.
Nail holes
- Depending on the strength of your nailer you may have nails that stick out just beyond the surface of your wood. Use a nail punch to hammer these nails just below the surface of the wood.
- Fill each nail hole with Spackle by wiping a tiny amount in each hole with a dry finger.
- Once the Spackle is dry, sand smooth with fine grit sand paper.
Once these steps are complete and you've sanded everything smooth, give your entire project a wipe down with a damp cloth or paper towels to get rid of any dust before moving onto the next step.
Caulking for a finished look
This step is a bit time consuming but VERY worth it. So put on some music and dive in! - Did I mention it's one of the most satisfying parts of the project and when you stand back after this step you're going to be really impressed with your work!
- Make sure your entire project is clean and free of dust.
- Run a small bead of caulk along every single gap and seam one at a time.
- Dip your finger in a small bowl of water and run it along your bead of calk for a smooth finish. ** You'll want plenty of paper towels on hand for your fingers.
- You'll do every single seam on the entire project.

Final coat of paint
You'll notice that I gave everything a coat of paint before building and installing. Doing this saves a ton of time and reduces brush and drip marks because you can quickly paint each piece while it's flat (in a place like the garage) with a foam roller.
But once you've patched and caulked everything, you'll need to put a final coat of paint on your entire project.
The key to a finished look is to use a small foam roller and not ever have too much paint on your paint brush for the corners.
A couple tips:
- It’s best to use a semi gloss paint so your shelves are easy to dust.
- To get an exact match to the IKEA drawers, take a drawer front to the hardware store and have them color match it.
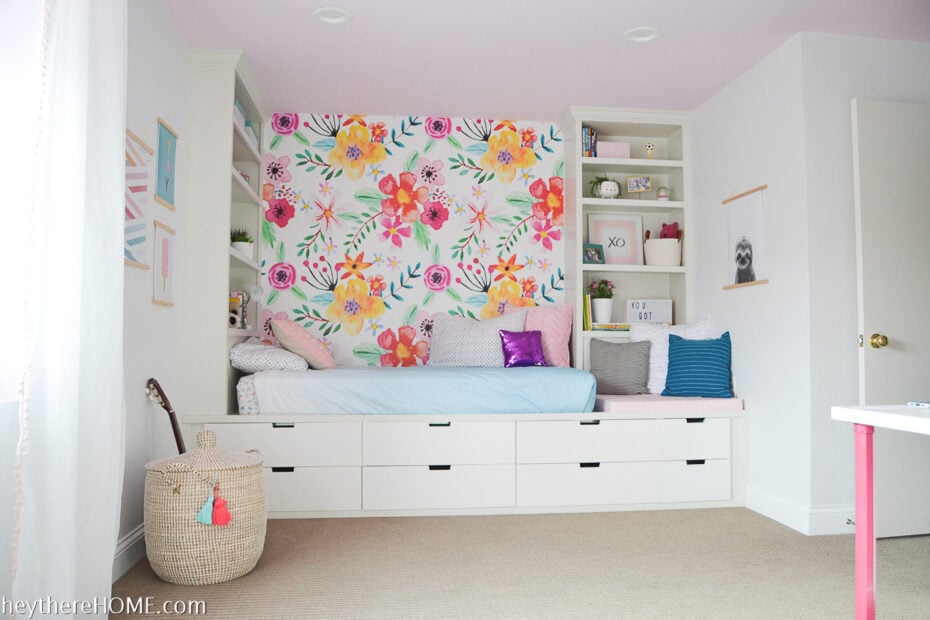
Turning This DIY Bed Into A Focal Point
To finish off the look of this DIY bed we added removable wallpaper behind it in a bold floral print. (This print is from Coloray Decor. The artist has an Etsy shop, but this print isn't always in her shop. If you can't find it there, go directly to her website.)

This DIY bed turned out way better than I imagined. I love that it freed up so much floor space in her bedroom and the decor will last for several years as she gets older.


You May Also Like

P.S. What if I told you there's a whole new (and way easier) way to decorate your home—without the overwhelm, indecision, or endless Pinterest scrolling.

Inside my online decorating program, Style Your Way Home, I'll walk you through the process of discovering and defining your decorating style, creating a home decor plan, and show you how to apply it in any space so each room is unique while maintaining a cohesive look that feels like YOU! - When you join now, you'll get direct support from me... it's like having a design BFF in your back pocket!
