DIY Peek-a-Boo Bag Tutorial to Store Small Toys
Follow this easy peek a boo bag tutorial to store and organize your kids' small toys.
It is official! My. kids. have. toys.
As my daughter gets older her toys seem to be made up of lots of little things-- And I thought big bulky primary colored stuff was bad! Ha!
I had to come up with a way to keep all those pieces together so she can get out and put away her toys by herself, and these peek a boo storage bags do just that!

Just look at my little lady! She's a very organized three year old so these toy storage bags put a giant smile on her face. (I have no idea where she gets the "everything in it's place" thing… who ME?) Anyway, she's already in love with getting these bags out, playing, and then putting them back!
This post contains affiliate links for your convenience. Read the full disclosure.
Supplies
- Fabric - ½ yard per bag
- Draw string - 30 inches per bag
- Clear vinyl - less than 30 gauge will be perfect for this project
- Bias tape - in a coordinating color
You May Also Like


How to Make a Fabric Peek-a-Boo Bag
Instructions are for a bag that is 14 inches wide and 15 inches tall.
Cut the following pieces
- (Back) 16 ½ x 15
- (Front top) 9x15
- (Front bottom) 5x15
- (Vinyl) 4x15
- Two 15 inch pieces of draw string
- Four 2 ½ inch pieces of bias tape

Assemble the toy storage bags
Step 1
Fold the bottom edge of the front top piece under ½ an inch and iron to keep flat. Do the same to the top edge of the front bottom piece.
Step 2
Fold the top edge of the back piece under 1 inch and iron to keep flat. Do the same 1 inch fold to the top edge of the front top piece of fabric.

Step 3
Line up the vinyl with the folded back edge of both the top front and bottom front pieces of fabric and sew into place.
Tip: Sewing vinyl can be tricky because the foot on your sewing machine sticks to the vinyl. To make it easier put a small piece of painters tape on the foot and it will slide through.

Step 4
On both the back and front top pieces (that you folded down 1 inch) find the exact middle and mark it.
Step 5
Measure 1 ¼ inches from that mark in each direction so that you have a 2 ½ inch line along the ironed edge.
Step 6
Using your scissors cut a tiny hole at one end of your line big enough for your scissors to get into and then cut a clean line down your mark (2 ½ inches long).
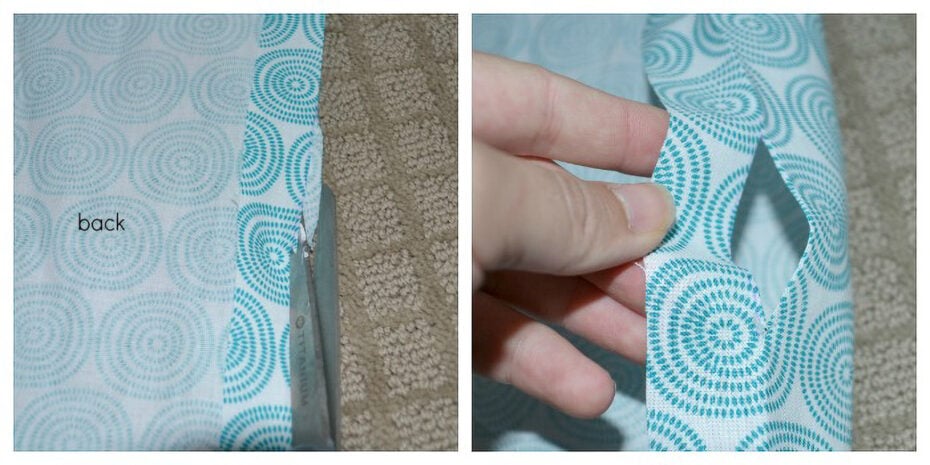
Step 7
Fold a piece of bias tape over each edge of your slit and sew into place.
Do this for both the back piece and the top front piece of fabric.

Step 8
Place a piece of draw string on the ironed line and fold the fabric over.
Sew the flap down, but do not sew the draw string to your fabric. It will be in the tube loosely.

Step 9
Now place your finished front piece and the back piece together print side in and pin in place.
The most important part that you need to line up is the top edges where your draw strings are. (If you're new to sewing you're bound to have some edges not lining up correctly. That's ok. Just trim them so that everything is even before you start sewing. Ha! Don't tell the experts I told you to do this.)

Step 10
Sew around the 3 edges (NOT THE TOP EDGE) using a ½ inch seam. It is really important that you catch the draw string in the seam here. Go slowly cause it's thick.

Trim any uneven spots after you sew your first seam and then serge the edges. If you don't have a serger (like me) just sew along the edge with your zig-zag stitch.
Step 11
Turn your bag right side out and fill it with some junk… uh.. I mean, TOYS!

I've been working on getting our play space (our loft) a fun place to be. So far I've created a completely kid friendly ottoman, reading nook , and a fun place to display the kids' art!


P.S. Want 30 step-by-step tasks to completely declutter your home?
In my online course, The Declutter Method, you'll learn the simple mindset and efficiency hacks, plus get a step-by-step decluttering plan that will have you decluttering entire spaces without making a bigger mess and burning out. Join the hundreds of students who have made huge progress and seen big results!
