• Skip to primary navigation
  • Skip to main content
  • Skip to primary sidebar
  • Skip to footer
  • New Here?
    • Meet Corey
    • Contact
  • Decorate Your Home
    • Popular Posts
    • Color In Your Home
    • How to Decorate
    • Declutter & Organize
    • DIY Projects
    • Seasonal Decor
  • My Courses
    • Style Your Way Home
    • The Declutter Method
    • Color Made Clear
    • Student Login
  • Tour My Home
  • Shop My Home
  • Hey There, Home
  • Nav Social Menu

    • Facebook
    • Instagram
    • Pinterest
    • YouTube
Hey There, Home

Hey There, Home

DIY Home Decor and DIY Project Tutorials

Free interior color class

DIY Sharpie Plate With Fall Leaves

Pin41.6K
Share734
Email
42.3K Shares
sharpie plate for fall
how to make a sharpie plate
How to decorate plates with Sharpies
easy fall craft sharpie plate
DIY Sharpie craft on ceramic
Fall sharpie plate DIY

Inside: Fall Leaf Sharpie Plate would make a perfect hostess gift or plate for appetizers. Full tutorial and tips to help you make one too!

I love this time of year because it means having lots of friends and family over to celebrate the season.

Every year I struggle with the idea of buying such season specific serving dishes because they can be pricey. But I saw a plate in a catalogue  that I couldn’t get out of my head and had to come up with a way to avoid spending almost $60 on it. And so this fall leaf Sharpie plate was born and although it turned out a little bit differently than I had envisioned, I love the result. Plus my cost for this plate and bowl was about $15. Boo-ya!

How to decorate plates with Sharpies

This post contains affiliate links for your convenience. Click here for the full disclosure.

Fall leaf sharpie plate supplies:

  • oven safe ceramic serving piece
  • metallic Sharpies: silver seemed to work the best
  • contact paper
  • white paper
  • a pencil
  • scissors
  • an oven

How to make a sharpie plate with fall leaves:

First you will need to decide on a design.

I chose fall leaves for a few reasons.

One, I can get by using the leaf motif for both fall and winter (remember my fear of too seasonally specific stuff.)

And two, they’re a simple silhouette without a lot of detail, which is perfect for this project.
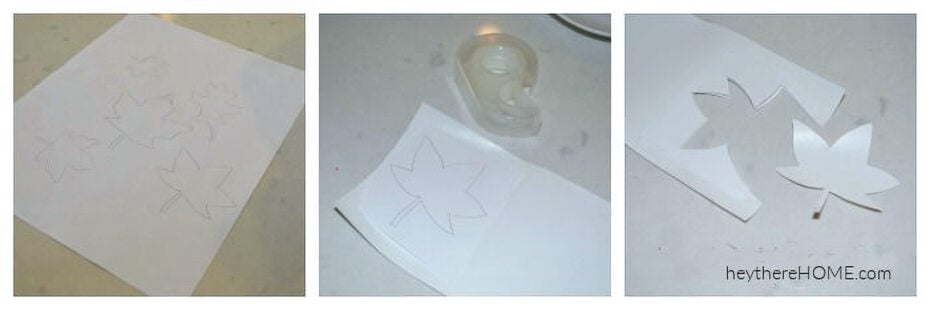
Do a quick Google search for “fall leaf silhouette.” There are a ton to pick from.

Try to find ones you like that don’t have a lot of jagged edges. This will make your job easier later.

Make them the size you want (based on the size of your plate and bowl) by zooming in; then simply lay white paper over them and trace lightly with a pencil.

easy sharpie craft for fall

Tape each leaf to the white side of some contact paper and cut it out so that you now have a sticker in the shape of that leaf, which will be your stencil.

leaf silhouette art

Decide where you want to place your leaves onto your plate and stick them there by peeling off the back side of the contact paper.

Be sure they are securely stuck with no air bubbles, especially around the edges.

sharpie plate

Now you’re ready to get polka-dotting!

Important info about putting your ceramic plate in the oven and washing your sharpie plate.

So, before I started this project, I did some reading about how this whole Sharpie mug and plate thing really works.

From what I read, oil based Sharpies work best, black and metallic Sharpies come in second, and using a coating at the end is ideal.

All of it won’t last forever if you plan to wash it, and it should be hand washed. So for my seasonal use of this, I used metallic Sharpies with a clear coat, and I plan to hand wash it.

Putting the design on your leaf silhouette plate

You will be doing many layers of dots. I started with one color and did some larger dots all around my leaves, focusing on the edges. I added another layer of larger dots with each color: silver, gold, and copper.

Then I went back with each color and added dots by just dotting all over, making sure that lots of dots are at the edges of the leaves. So many in fact that you couldn’t see the white on the line where the contact paper and plate met. Think ombre here, people. The dots will be heavy at the edge of the leaves and fade out.

When you are satisfied with your dotting, let it dry and then peel off your contact paper leaves. (I repeated these steps for the bowl too).

fall crafts for the home

Making the sharpie permanent on your ceramic plate

Place your plate into a cold oven and set it to 350 degrees.

Once it hits 350 degrees, bake for 30 minutes and then let it cool in the oven too. I opened my oven a little bit to help it cool.

I made two of these and sprayed one with  Acrylic Sealing Spray after letting it sit overnight (I used Krylon moisture resistant clear spray**).

Because I was concerned that the spray is not food safe, I didn’t spray the second one and after washing both by hand, they looked exactly the same. So if you plan to use your dish for food, I would consider not spraying. If however it is purely decorative, spray away!

And here is the result! If you love it, be sure to pin it by hovering over the image!

Fall sharpie plate DIY

When I said at the beginning of the post it didn’t turn out exactly as I had imagined, I was referring to the colors. The gold and copper didn’t look as shiny as I thought they would.

Still, I love the result and actually like how subtle the colors are. It makes it a bit more modern…and a bit more my style.

So now I’m ready to serve some appetizers with a little dip on the side all season long! It’ll look perfect on the table with my modern and cozy fall tablescape!

This is just one of 5 awesome projects for you today… so click through the list below to get inspired by some more great bloggers and don’t forget to pin the projects along the way!

easy fall projects

1) Spiced French Toast with Caramel Maple Syrup by Whistle and Ivy
2) Pony Bead Indian Corn by Cutesy Crafts
3) Silk Leaf Table Runner by Cook and Craft Me Crazy
4) Fall Leaf Sharpie Plate by Hey There, Home
5) Chalkboard Vinyl Autumn Banner by Keeping it Simple

Pin41.6K
Share734
Email
42.3K Shares

Filed Under: Decorate Your Home, Fall & Thanksgiving, Seasonal Decor

email signature no image

Free interior color class

Reader Interactions

Comments

  1. Nana Lynn says

    September 19, 2015 at 8:31 pm

    I wonder if trying this on the bottom side of a clear platter would allow for use with food?

    Reply
  2. jelli says

    April 8, 2014 at 7:06 am

    Love this! I was planning to do this to my bowls soon because I’m sick of how boring they are and have just been looking forward to every time one gets dropped (that much closer to buying new dishes!) Will definitely be doing this this week. Thanks for sharing!

    Reply
    • tinysidekick says

      April 8, 2014 at 9:33 pm

      Haha! That is funny. It makes it easier to justify getting new ones if you run out right? This would be a great way to jazz them up!

  3. gold plating victorian 5 stone engagement rings says

    December 6, 2013 at 5:32 pm

    Good post. I learn something new and challenging on blogs I
    stumbleupon everyday. It will always be useful to read articles from other writers and use a little something
    from other web sites.

    Reply
  4. Brenda @ Chatting Over Chocolate says

    November 19, 2013 at 5:32 pm

    I saw your beautiful Fall Leaf Sharpie Plate featured at the Homemade By You link party tonight and had to come check it out! LOVE it!! Pinned 😉 Thanks so much for sharing, and congrats on the well deserved feature! 🙂

    Reply
    • tinysidekick says

      November 19, 2013 at 7:33 pm

      Thank you Brenda! It was my first Sharpie project attempt and now I think I’m hooked! The possibilities are endless. Thanks for stopping by!

  5. Marie says

    November 16, 2013 at 7:20 pm

    I love them! That would make a great Christmas gift.
    Marie

    Reply
  6. Trina @ afewmineradjustments.blogspot.com says

    November 15, 2013 at 7:27 pm

    That is so cute! I love it….really original. I’m pinning it to our board. Thanks for linking up to the Twirl and Take a Bow Party! Hope to see you again next Tuesday!

    Reply
    • tinysidekick says

      November 19, 2013 at 11:55 am

      Thank you! I’ll be there!

  7. Elena says

    November 15, 2013 at 7:59 am

    Hey Corey!

    I just wanted to let you know that one of our co-hosts at The PINcentive Blog Hop chose this post as a winner, so CONGRATULATIONS! We absolutely loved the idea of your fall leaf sharpie plate :o) It came out so great and is absolutely a fabulous idea for the holidays! As a winner, I’d love to feature this post at our next hop and it will be pinned a minimum of 31 times by my team of pinners! Additionally, we’d love to have you co-host our next hop and choose our winner. It’s a great opportunity to make new friends and increase your following. You are also entitle to priority seating at our next hop which means I will add the URL of the post you’d like to link up manually :o)

    I hope you are as excited as we are! Please feel free to contact me at your earliest convenience. Since I’m working under a rather tight deadline, your timely response would be greatly appreciated! If you decide to co-host, I’d need your 3 preferred methods you’d like blog hop participants to follow you and the URL of the post you’d like to link up this week.

    Thanks so much and I look forward to hearing from you! Happy Friday!

    Elena
    croppedstories@gmail.com

    Reply
    • tinysidekick says

      November 19, 2013 at 11:55 am

      So excited! Thank you!

  8. Carrie This Home says

    November 14, 2013 at 11:53 am

    I love how this turned out, Corey! This plate would make an awesome Christmas present! I’m so glad you shared this at Frugal Crafty Home Blog Hop! I hope we see you back on Sunday night!

    Reply
  9. Jocie@OPC says

    November 14, 2013 at 10:43 am

    really really amazing!!! love it! sharing on FB today and featuring you on the blog tonight. 🙂

    Reply
    • tinysidekick says

      November 19, 2013 at 11:54 am

      Thanks Jocie!

  10. Deb @ kneaded Creations says

    November 13, 2013 at 7:45 pm

    What a great idea! I love that you can use different colors of the sharpies to bring out different aspects of the design. Glad you posted at the Brag About IT link party. I’ve pinned, liked, twittered and G+-ed your post. I’d love it if you dropped by for a visit at http://www.kneadedcreations.com . I look forward to seeing you over there! Deb @ Kneaded Creations.

    Reply
  11. Toni says

    November 13, 2013 at 6:07 pm

    I’m really loving this idea! I don’t bother buying the fancy “holiday specific” dishes either, but it would be nice to have something cute that matches my personal style. Great job! They look amazing!

    Reply
  12. Lisa says

    November 13, 2013 at 7:35 am

    Ooh, these are so cute! Love the sharpie plate. And thanks for visiting Mabey She Made It!

    Reply
  13. Leslie R. says

    November 13, 2013 at 4:57 am

    Love it. Pinned it. Would love to feature it at my linky party www.seasonedhomemaker.com

    Reply
    • tinysidekick says

      November 19, 2013 at 11:52 am

      Geeze I got behind on replying. I did get to the party though. Thanks for the invite!

  14. Kayla @ Home Coming says

    November 12, 2013 at 2:48 pm

    I love this project! So easy, yet beautiful! I’m hosting a Starburst Mirror Giveaway that you should enter! http://homecomingmn.blogspot.com/2013/11/starburst-mirror-giveaway.html

    Reply
  15. Melissa @ Two It Yourself says

    November 11, 2013 at 10:17 am

    Oh my goodness this is soooooo awesome! I love what you have done and I DO think it’s perfect even if the colors aren’t exactly what you were imagining. I am pinning this immediately! Like you, I have often wondered if the sharpie and bake thing actually works and it looks like it has. I think I would use it more as a decorate piece and a special occasions serving tray to preserve it! I would absolutely love it if you liked up your fall leaf sharpie plate with us at the Link it or Lump it Link Party! http://www.twoityourself.blogspot.com/2013/11/LinkParty13.html

    – Melissa

    Reply
    • tinysidekick says

      November 19, 2013 at 11:50 am

      Thanks Melissa. I did link up. Thanks for the invite!

  16. Marni @ Haberdashery Fun says

    November 11, 2013 at 7:52 am

    This is awesome!! A great reminder that I NEED to buy a Silhouette Machine

    Reply
  17. Krista @ the happy housie says

    November 10, 2013 at 4:30 pm

    I really love the scatter effect – the reverse design is so fun and modern. Awesome project and great tips Corey. Pinning.

    Reply
  18. Julie says

    November 10, 2013 at 3:10 am

    Lovely, and thanks for the “sharpie on china” tips, I have been wondering how well they last/the best way to go about it. Perfect for jazzing up something for a special occasion without having to spend a lot.

    Reply
  19. Maggie @ The Love Nerds says

    November 9, 2013 at 8:17 am

    This is absolutely gorgeous. I love the design! I am curious about how it is food safe though. Is the acrylic spray you used specifically designed to make it food safe? I know that I haven’t done as many sharpie projects in the past as I wanted to because of this issue and the food safe porcelain markets can be hard to find.

    Reply
    • tinysidekick says

      November 10, 2013 at 10:34 am

      Hi Maggie! Ya know…I thought about the same thing and actually made 2 of these at the same time. (I was planning to give one as a gift.) But when it came to the spray, I only sprayed one of them. After washing both by hand, they look the same. So if you are going to use the dish, I wouldn’t bother spraying. As for the actual Sharpie, not really sure, but again, this is a plate I am only using once in awhile. I updated my post to reflect my findings. Thanks for stopping by!

  20. Abby @ Just a Girl and Her Blog says

    November 7, 2013 at 7:44 pm

    Love this! So beautiful and classy! I’m sure your guests will love them as well. And you can’t beat the price! Hope you’re having a great day, Corey!

    ~Abby =)

    Reply
    • tinysidekick says

      November 10, 2013 at 10:36 am

      Thanks Abby!

  21. Amy W says

    November 6, 2013 at 9:13 pm

    I love this project! The platter turned out awesome. Bummer about the gold and copper not quite working out, but it looks great regardless. I just did a similar project with mugs and used regular old black sharpie, baking at 375F… I did a test in the dishwasher and surprisingly, no harm! I didn’t hear about adding that last step of sealer. I might add that just to be safe. Thanks for sharing!

    Reply
    • tinysidekick says

      November 7, 2013 at 2:39 pm

      Thanks Amy. I was so nervous to try this project, but now I can’t help but think what else I can put onto plates and bowls and mugs.

  22. Bethany says

    November 6, 2013 at 8:41 pm

    What a great idea! I love the silhouette look, super classy 🙂 Gorgeous!

    Reply
  23. Brooklyn says

    November 6, 2013 at 12:26 pm

    THIS IS GORGEOUS! I thought this was glitter! It looks AMAZING! xoxo-Brook

    Reply

Trackbacks

  1. Spiced French Toast with Caramel Maple Syrup and Thanksgiving Roundup - Whistle and Ivy says:
    June 27, 2015 at 9:21 pm

    […] Bead Indian Corn – Cutesy Crafts} {Silk Leaf Table Runner – Cook and Craft Me Crazy {Fall Leaf Sharpie Plate – Tiny Sidekick} {Chalkboard Vinyl Autumn Banner – Keeping it […]

    Reply
  2. Saturday Favs and the DIY Sunday Showcase - says:
    December 17, 2014 at 5:38 pm

    […] Pick: Fall Leaf Sharpie Plate from Tiny […]

    Reply
  3. 10 Beautiful Fall Projects to Inspire You | Pleroma says:
    September 22, 2014 at 4:48 pm

    […] A fall sharpie plate – This plate and bowl set only cost $15. Find out how to do it yourself from Tiny […]

    Reply
  4. 100 Fall Project Ideas says:
    September 1, 2014 at 7:07 am

    […] If you’ve ever wanted to try a Sharpie plate, this one is really easy and doesn’t require you to have perfect handwriting.  See how I made a stencil and and created this modern Fall Leaf Plate in this post. […]

    Reply
  5. The Makers Link Party | Upcycled Treasures says:
    August 13, 2014 at 10:37 am

    […] Inspired Lace Curtains 25 Painted Furniture Projects to Inspire  ||  Fall Leaf Sharpie Plate Easy Washi Tape Storage || Crochet Pineapple Pattern || Watercolor Portraits & Craftsy […]

    Reply
  6. 10 Holiday Ready Home Ideas {Must Pin Projects} - Becoming Martha says:
    January 15, 2014 at 6:21 pm

    […] Sharpie Plate […]

    Reply
  7. 10 Holiday Ideas says:
    November 20, 2013 at 4:01 pm

    […] Sharpie Plate […]

    Reply
  8. 10 Holiday-Ready Home Ideas - Wait Til Your Father Gets Home says:
    November 20, 2013 at 4:01 pm

    […] Sharpie Plate […]

    Reply
  9. 10 Home for the Holidays Ideas says:
    November 20, 2013 at 4:01 pm

    […] Sharpie Plate […]

    Reply
  10. Lovely Ladies Linky No. 11 + Blogger Giveaway Opportunity! - This Silly Girl's Life says:
    November 19, 2013 at 9:01 pm

    […] Fall Leaf Sharpie Plate from Tiny Sidekick […]

    Reply
  11. Homemade By You #76 - Made To Be A Momma says:
    November 19, 2013 at 4:33 pm

    […]                                       Sharpie Plate from {Tiny Side Kick} […]

    Reply

Leave a Reply Cancel reply

Your email address will not be published. Required fields are marked *

Primary Sidebar

Corey of Hey There Home

I break decorating down into simple and repeatable steps that anyone can follow, --even if you don't have an eye for design, so you can create a beautiful home that feels like YOU. >> Learn more.

Let’s connect!

  • Facebook
  • Instagram
  • Pinterest
  • YouTube
Select Paint Colors for your Whole House
the ultimate guide for choosing and using color in your home

Take a free decorating class

Footer

More Freebies:

Free Video Class: Choose & Use Color In Your Home Like A Pro

Free Video Class: 3 Steps To Decorate Any Area In Your Home

Important Links:

My You Tube Channel

Contact

© Hey There Publishing, LLC

All images, text, and free downloads are the property of Hey There Publishing, LLC and can not be used in any way without written consent.

Disclosure & Cookie Policy

Let’s Connect!

  • Facebook
  • Instagram
  • Pinterest
  • YouTube

Search this site

Hey There, Home

Copyright Hey There Publishing, LLC © 2022 ·